|
TinkercadTinkercad is an easy-to-use, online tool for creating digital designs that are ready to be 3D printed into physical objects. Users are guided through the 3D design process through 'lessons', which teach the basics before moving on to more complex modeling techniques.
|
How Do I Get Started?
In order to get started with the Tinkercad engagement, you'll need to first sign up for an account at Tinkercad.com. As with all engagements, if you are working with a partner it is super important to use an email and password that BOTH of you will remember, or to each sign up for an account. I suggest adding this information to your project planner in case you need to access it later.
Required Lessons & Activities - You Must Complete Them All
You must complete the follow activities to learn about 3D design and printing. These are required before you can design or print items of your choice.
|
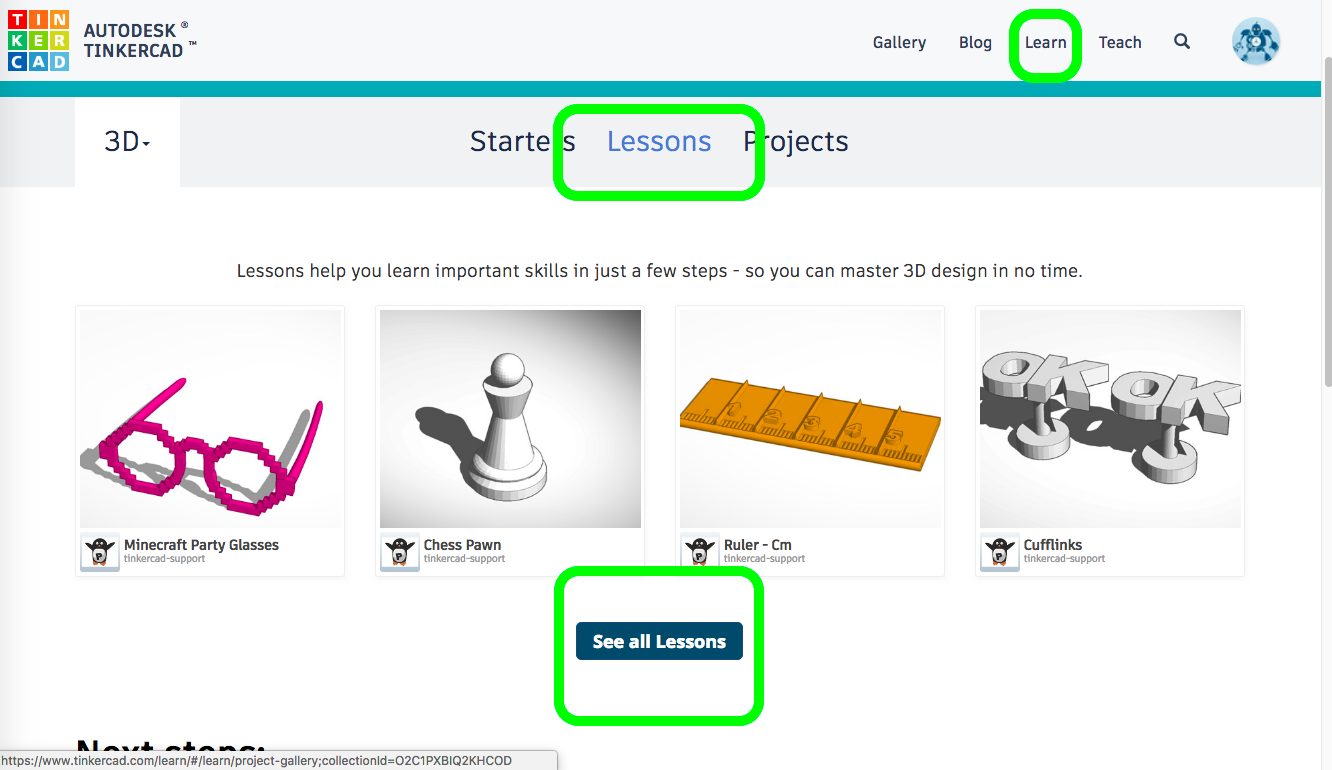
Tinkercad Lessons
|
|
Required Lessons
|
Learning the Moves
Camera Control Creating Holes |
Scale Copy and Paste
Key Ring, Letters Die on the Workplane |
Tinkercad Cube Activity
- Design an object that will fit in a 50mm by 50 mm by 50 mm cube
- This object must contain at least one shape.
- This object must contain at least one hole.
- Turn in your STL file below.
What Can I Design?
You can design anything you want. A large part of this engagement is learning to use Tinkercad and designing in 3D. You can design in any color you want. The colors used in your design do not represent the filament color used for your object.
3D Print a Surfboard
3D Print a Surfboard
What Can I Print?
- Invention - create something that solves a real life problem and/or is useful to. For example a spool for external filament for the M3D printer or a cookie cutter.
- Architecture - design a cityscape, famous building, or a model of your house
- Action Figure or Figurine - Thor with Mjolnir
- Miniature Board Game Pieces - chess pieces, Monopoly houses, Lego bricks
- Decorations for a Holiday - an ornament, a dreidel, etc.
What Color Will My Print Be?
Your objects will be printed in the color that is currently in the printer. Special color requests may be honored, but there will be a significant delay in the print time for these.
Steps to Printing Your Design
- Download your design as an STL
- Complete the printing checklist
- View the accuracy of your printing checklist
- Make changes to your design if needed and complete the checklist again.
- Conference about your design and your checklist with your teacher
- Conference with Mrs. Rosen about printing
- If Miss Hauman is your teacher, please email her to let her know when you plan on coming in to discuss your design.
- You will turn in your printing file when you meet with Mrs. Rosen.
Calculating the Cost of Your Print
Before you calculate the cost of your design, determine if you need to use Brims, Supports or Rafts for your project. ***NOTE - If the cost of your design is more than a roll of filament, it will not be printed.***
Calculate Cost of your Design:
Filament in Amount of Grams
Grams on entire spools
So, to find your cost do the following
28 x The amount of grams determined by Cura all divided by 1,000g
28 x amount of grams of your object will be using) ÷ 1,000 = The cost of your project.
Calculate Cost of your Design:
- Open Cura LulzBot Edition
- If prompted to select a printer pick Lulzbot Taz 6. Continue to the next screen and finish.
- Open your design
- Change the Material to PolyLite PLA
- Change the Profile to Standard
- Infill should be 20%
- You need to decide if it needs a skirt, raft, brim, and/or supports and select those options. If not, make sure you select none.
- Then your design will slice
- From here, you can get the grams and calculate the cost.
Filament in Amount of Grams
Grams on entire spools
So, to find your cost do the following
28 x The amount of grams determined by Cura all divided by 1,000g
28 x amount of grams of your object will be using) ÷ 1,000 = The cost of your project.
After Your Designs Are Printed
Upload multiple pictures of your 3D prints to the 3D printing gallery. Use the upload file section below. Make sure to take pictures of your object from many different views (top, side, bottom, front, back, zoomed in, etc.)
